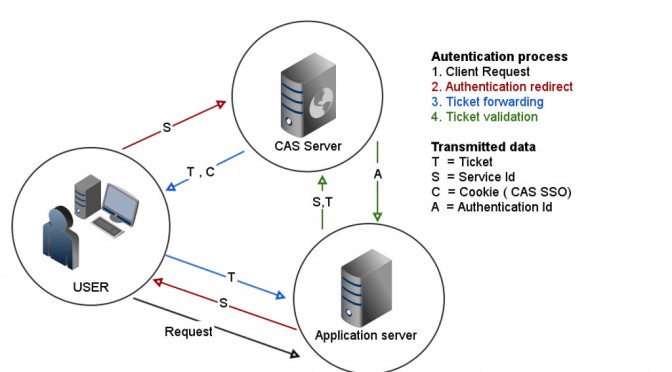
We are searching for CAS (Central Authentication Service) for a project .
The Central Authentication Service (CAS) is a single sign-on protocol for the web. Its purpose is to permit a user to access multiple applications while providing their credentials (such as userid and password) only once. It also allows web applications to authenticate users without gaining access to a user’s security credentials, such as a password
We are evaluating CAS solution from:
In this post I’ll try to explain how to get jasig CAS up and running.I’m assuming that all CAS related programs will be in /opt/CAS , if you need them in other location you will have to slightly adjust the paths.
To get it up and running you will need:
- Apache maven (http://maven.apache.org/). I used version 3.0.5 ( latest at the time of the post writing ) . Instalation of apache maven is straight forward .
mkdir -p /opt/CAS
cd /opt/CAS
wget http://mirrors.hostingromania.ro/apache.org/maven/maven-3/3.0.5/binaries/apache-maven-3.0.5-bin.tar.gz
tar xf apache-maven-3.0.5-bin.tar.gz
export PATH=$PATH:/opt/CAS/apache-maven-3.0.5/bin
- Apache tomcat(http://tomcat.apache.org/). Again I used version 7.0.41
cd /opt/CAS
wget http://mirrors.hostingromania.ro/apache.org/tomcat/tomcat-7/v7.0.41/bin/apache-tomcat-7.0.41.tar.gz
tar xf apache-tomcat-7.0.41.tar.gz
- jasig CAS software (http://www.jasig.org/cas) . We used 3.5.2 release of the software.
cd /opt/CAS
wget http://downloads.jasig.org/cas/cas-server-3.5.2-release.tar.gz
tar xf cas-server-3.5.2-release.tar.gz
- Mysql Java Connector software (http://dev.mysql.com/get/Downloads/Connector-J/mysql-connector-java-5.1.25.tar.gz/from/http://cdn.mysql.com/) . We used 5.1.25 release of the software.
cd /opt/CAS
wget http://dev.mysql.com/get/Downloads/Connector-J/mysql-connector-java-5.1.25.tar.gz
tar xf mysql-connector-java-5.1.25.tar.gz
Now we have everything we need for the build. Let’s start configure it
Edit the file: cas-server-3.5.2/cas-server-webapp/pom.xml
And change commons-dbcp version from 1.2.2 to 1.4 . Otherwise the CAS will give some obscure null errors after startup. After athat add the following:
<dependency>
 <groupId>mysql</groupId>
 <artifactId>mysql-connector-java</artifactId>
 <version>5.1.25-bin</version>
 <scope>provided</scope>
 </dependency>
Edit the file cas-server-3.5.2/cas-server-webapp/target/cas-server-webapp-3.5.2/WEB-INF/deployerConfigContext.xml and add the following ( required for mysql support and changed default demo authentication to mysql auth)
<!--                <bean
 class="org.jasig.cas.authentication.handler.support.SimpleTestUsernamePasswordAuthenticationHandler" />
 -->
<bean class="org.jasig.cas.adaptors.jdbc.SearchModeSearchDatabaseAuthenticationHandler"> <property name="tableUsers"> <value>users</value> </property> <property name="fieldUser"> <value>username</value> </property> <property name="fieldPassword"> <value>password</value> </property> <property name="passwordEncoder"> <bean class="org.jasig.cas.authentication.handler.DefaultPasswordEncoder"> <constructor-arg value="MD5" /> </bean> </property> <property name="dataSource" ref="dataSource" /> </bean>
And at the end of file before /beans add the mysql configuration:
<bean id="dataSource" class="org.apache.commons.dbcp.BasicDataSource">
 <property name="driverClassName">
 <value>com.mysql.jdbc.Driver</value>
 </property>
 <property name="url">
 <value>jdbc:mysql://localhost:3306/cas</value> <!-- Replace this line with the database containing the users table -->
 </property>
 <property name="username">
 <value>REPLACE_ME</value> <!-- Replace this line with the MySQL username -->
 </property>
 <property name="password">
 <value>REPLACE_ME</value> <!-- Replace this line with the actual MySQL password -->
 </property>
 </bean>
On your mysql server create the database and table where the users will be kept and insert a test user :
create database cas;
 grant all on cas.* to REPLACE_ME@127.0.0.1 identified by 'REPLACE_ME';
 CREATE TABLE users (username char(20) PRIMARY KEY NOT NULL, password char(64));
 INSERT INTO users(username, password) VALUES ('Test44',MD5('passTest'));
Now the building part:
1. First install mysql connector
mvn install:install-file -DgroupId=mysql -DartifactId=mysql-connector-java -Dversion=5.1.25-bin -Dpackaging=jar -Dfile=../../mysql-connector-java-5.1.25/mysql-connector-java-5.1.25-bin.jar
2. Next build the war file
mvn package install
Install the package into tomcat directoy:
cp cas-server-3.5.2/cas-server-webapp/target/cas.war /opt/CAS/apache-tomcat-7.0.41/webapps
And after this restart your tomcat and point a browser to http://localhost:8080/cas and you should have a CAS instance up and running.
Things to test from this point forward:
- Test custom table structure
- Configure tomcat for SSL
- How to add custom password encryption
- How to add custom SQL auth string
- Attribute releasing from database
- Integration with a website
- Facebook login , oAuth login
