A quick post / howto install a a swarm / consul cluster of dockers hosts and how to play with it. I will not go deep into details and lots of this from this post should and will be detailed or changed for a production environment.
How it will look like:
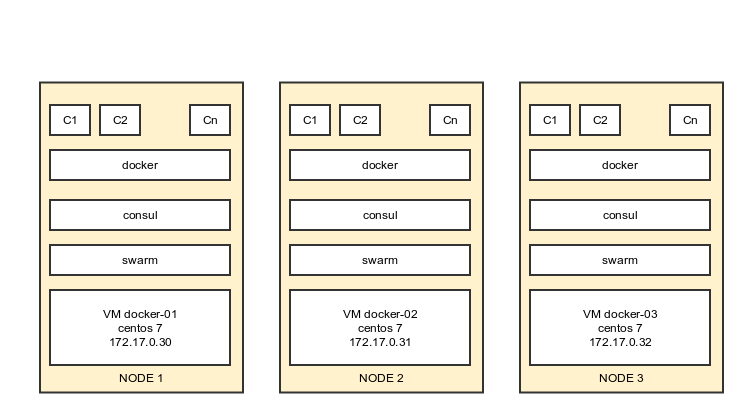
For the proof of the concept we will use 3 VMs in virtualbox.
Initially node1 , node2 , node3 will be identically configured. After the cluster is set up node1 will be also the management node.
Installing Node1:
- Install centos7
- Disable firewald
- Install docker from repo. Then update docker to 1.6.2 ( manually override /usr/bin/docker with the one from docker.io ) ( wget https://get.docker.com/builds/Linux/x86_64/docker-latest )
- Download and install consul ( wget https://dl.bintray.com/mitchellh/consul/0.5.2_linux_amd64.zip )
- Add consul configuration file
[root@docker-01 server]# cat /etc/consul.d/server/config.json { "bootstrap_expect": 3, "server": true, "data_dir": "/var/consul", "log_level": "INFO", "enable_syslog": false, "retry_join": ["172.17.0.30", "172.17.0.31", "172.17.0.32"], "client_addr": "0.0.0.0"} |
- Donwload and install consul UI ( wget https://dl.bintray.com/mitchellh/consul/0.5.2_web_ui.zip)
- run consul agent
/usr/local/bin/consul agent -config-dir="/etc/consul.d/server/config.json" -ui-dir="/var/www/html">>/var/log/consul.log 2>&1 & |
- join the node in swarm cluster:
docker run -d swarm join --addr=172.17.0.30:2375 consul://172.17.0.30:8500/swarm |
- run the registration in consul service
docker run -d --name regdock01 -h docker01 -v /var/run/docker.sock:/tmp/docker.sock progrium/registrator consul://172.17.0.30:8500 |
- run the swarm management:
docker run -d -p 3333:2375 swarm manage consul://172.17.0.30:8500/swarm |
Installing Node2:
- Install centos7
- Disable firewald
- Install docker from repo. Then update docker to 1.6.2 ( manually override /usr/bin/docker with the one from docker.io ) ( wget https://get.docker.com/builds/Linux/x86_64/docker-latest )
- Download and install consul ( wget https://dl.bintray.com/mitchellh/consul/0.5.2_linux_amd64.zip )
- Add consul configuration file
[root@docker-02server]# cat /etc/consul.d/server/config.json{"bootstrap_expect":3,"server":true,"data_dir":"/var/consul","log_level":"INFO","enable_syslog":false,"retry_join": ["172.17.0.30","172.17.0.31","172.17.0.32"],"client_addr":"0.0.0.0"} - run consul agent
/usr/local/bin/consul agent -config-dir="/etc/consul.d/server/config.json">>/var/log/consul.log2>&1& - join the node in swarm cluster
docker run -d swarm join --addr=172.17.0.31:2375consul://172.17.0.31:8500/swarm - run the registration in consul service
docker run -d --name regdock02 -h docker02 -v /var/run/docker.sock:/tmp/docker.sock progrium/registrator consul://172.17.0.31:8500
Installing Node3:
- Install centos7
- Disable firewald
- Install docker from repo. Then update docker to 1.6.2 ( manually override /usr/bin/docker with the one from docker.io ) ( wget https://get.docker.com/builds/Linux/x86_64/docker-latest )
- Download and install consul ( wget https://dl.bintray.com/mitchellh/consul/0.5.2_linux_amd64.zip )
- Add consul configuration file
[root@docker-03server]# cat /etc/consul.d/server/config.json{"bootstrap_expect":3,"server":true,"data_dir":"/var/consul","log_level":"INFO","enable_syslog":false,"retry_join": ["172.17.0.30","172.17.0.31","172.17.0.32"],"client_addr":"0.0.0.0"} - Run consul agent
/usr/local/bin/consul agent -config-dir="/etc/consul.d/server/config.json">>/var/log/consul.log2>&1& - Join the node in swarm cluster
docker run -d swarm join --addr=172.17.0.32:2375consul://172.17.0.32:8500/swarm - Run the registration in consul service
docker run -d --name regdock03 -h docker03 -v /var/run/docker.sock:/tmp/docker.sock progrium/registrator consul://172.17.0.32:8500
Managing / viewing / running containers in cluster:
# show running containers in the clusterdocker -H tcp://172.17.0.30:3333 ps# show cluster nodes infosdocker -H tcp://172.17.0.30:3333 info# run containers in the cluster:docker -H tcp://172.17.0.30:3333 run -d --name www1 -p 81:80 nginxdocker -H tcp://172.17.0.30:3333 run -d --name www2 -p 81:80 nginxdocker -H tcp://172.17.0.30:3333 run -d --name www3 -p 81:80 nginx |
Consul web interface:

