Searching for Central Authentication Service

We are  searching for CAS (Central Authentication Service) for a project .

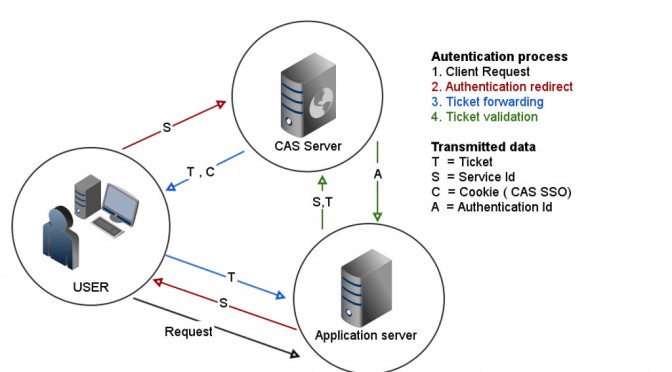
The Central Authentication Service (CAS) is a single sign-on protocol for the web. Its purpose is to permit a user to access multiple applications while providing their credentials (such as userid and password) only once. It also allows web applications to authenticate users without gaining access to a user’s security credentials, such as a password

We are evaluating CAS solution from:

In this post I’ll try to explain how to get jasig CAS up and running.I’m assuming that all CAS related programs will be in /opt/CAS , if you need them in other location you will have to slightly adjust the paths.

To get it up and running you will need:

    • Apache maven (http://maven.apache.org/). I used version 3.0.5 ( latest at the time of the post writing ) . Instalation of apache maven is straight forward .
mkdir -p /opt/CAS
cd /opt/CAS
wget http://mirrors.hostingromania.ro/apache.org/maven/maven-3/3.0.5/binaries/apache-maven-3.0.5-bin.tar.gz
tar xf apache-maven-3.0.5-bin.tar.gz
export PATH=$PATH:/opt/CAS/apache-maven-3.0.5/bin
cd /opt/CAS
wget http://mirrors.hostingromania.ro/apache.org/tomcat/tomcat-7/v7.0.41/bin/apache-tomcat-7.0.41.tar.gz
tar xf apache-tomcat-7.0.41.tar.gz
cd /opt/CAS
wget http://downloads.jasig.org/cas/cas-server-3.5.2-release.tar.gz
tar xf cas-server-3.5.2-release.tar.gz
cd /opt/CAS
wget http://dev.mysql.com/get/Downloads/Connector-J/mysql-connector-java-5.1.25.tar.gz
tar xf mysql-connector-java-5.1.25.tar.gz

Now we have everything we need for the build. Let’s start configure it

Edit the file: cas-server-3.5.2/cas-server-webapp/pom.xml

And change commons-dbcp version from 1.2.2 to 1.4 . Otherwise the CAS will give some obscure null errors after startup. After athat add the following:

<dependency>
 <groupId>mysql</groupId>
 <artifactId>mysql-connector-java</artifactId>
 <version>5.1.25-bin</version>
 <scope>provided</scope>
 </dependency>

Edit the file cas-server-3.5.2/cas-server-webapp/target/cas-server-webapp-3.5.2/WEB-INF/deployerConfigContext.xml and add the following ( required for mysql support and changed default demo authentication to mysql auth)

<!--                <bean
 class="org.jasig.cas.authentication.handler.support.SimpleTestUsernamePasswordAuthenticationHandler" />
 -->
<bean class="org.jasig.cas.adaptors.jdbc.SearchModeSearchDatabaseAuthenticationHandler">
 <property  name="tableUsers">
 <value>users</value>
 </property>
 <property name="fieldUser">
 <value>username</value>
 </property>
 <property name="fieldPassword">
 <value>password</value>
 </property>
 <property name="passwordEncoder">
 <bean class="org.jasig.cas.authentication.handler.DefaultPasswordEncoder">
 <constructor-arg value="MD5" />
 </bean>
 </property>
 <property name="dataSource" ref="dataSource" />
 </bean>

And at the end of file before /beans add the mysql configuration:

<bean id="dataSource" class="org.apache.commons.dbcp.BasicDataSource">
 <property name="driverClassName">
 <value>com.mysql.jdbc.Driver</value>
 </property>
 <property name="url">
 <value>jdbc:mysql://localhost:3306/cas</value> <!-- Replace this line with the database containing the users table -->
 </property>
 <property name="username">
 <value>REPLACE_ME</value> <!-- Replace this line with the MySQL username -->
 </property>
 <property name="password">
 <value>REPLACE_ME</value> <!-- Replace this line with the actual MySQL password -->
 </property>
 </bean>

On your mysql server create the database and table where the users will be kept and insert a test user :

create database cas;
 grant all on cas.* to REPLACE_ME@127.0.0.1 identified by 'REPLACE_ME';
 CREATE TABLE users (username char(20) PRIMARY KEY NOT NULL, password char(64));
 INSERT INTO users(username, password) VALUES ('Test44',MD5('passTest'));

Now the building part:

1. First install mysql connector

mvn install:install-file -DgroupId=mysql -DartifactId=mysql-connector-java -Dversion=5.1.25-bin -Dpackaging=jar -Dfile=../../mysql-connector-java-5.1.25/mysql-connector-java-5.1.25-bin.jar

2. Next build the war file

mvn package install

Install the package into tomcat directoy:

cp cas-server-3.5.2/cas-server-webapp/target/cas.war /opt/CAS/apache-tomcat-7.0.41/webapps

And after this restart your tomcat and point a browser to http://localhost:8080/cas  and you should have a CAS instance up and running.

Things to test from this point forward:

  1. Test custom table structure
  2. Configure tomcat for SSL
  3. How to add custom password encryption
  4. How to add custom SQL auth string
  5. Attribute releasing from database
  6. Integration with a website
  7. Facebook login , oAuth login


Upgrading HP c7000 blades

It comes a time when you need to update the ILO firmware / bios rom / OA firmware on a C7000 enclosure.

Best way to do this is like this:

  • Download OA firmware, ILO firmware and rombios ISO image .
  • From the web interface update ILO firmware.
  • Create an ILO user and enable ssh .
  • Activate ILO advanced license
  • Open a terminal and ssh to ilo
  • issue the following command from ilo command line:
vm cdrom insert http://192.168.1.1/ROMPAQINTEL.iso

vm cdrom connect
power on

  • From web browser open an ilo remote console to server and power it off.
  • After the server gracefully powers off issue a “power on” command from ILO
  • Switch to remote console and complete the update
  • After update is complete issue the following commands from ILO

power off
vm cdrom eject
power on

Enjoy updating.

Adventures with Cisco 7945 Phone

I recently got a Cisco 7945 Phone to play with.
1) I got it out the box , i connected it to my LAN and plugged in the power.
2) The phone started to send requests to my DHCP server . However it never stopped doing that.
Dec 17 21:54:11 localhost dhcpd: DHCPREQUEST for 172.17.1.13 from 00:1f:ca:ea:11:73 (SEP001FCAEA1173) via eth1
Dec 17 21:54:11 localhost dhcpd: DHCPACK on 172.17.1.13 to 00:1f:ca:ea:11:73 (SEP001FCAEA1173) via eth1
Dec 17 21:54:14 localhost dhcpd: DHCPRELEASE of 172.17.1.13 from 00:1f:ca:ea:11:73 (SEP001FCAEA1173) via eth1 (found)

3) A quick search on the net on how to set this phone up ( in the box I found no documentation so i guess google il my friend tonight ) revealed that i need to set up a tftp server to serve a software for the phone.  But to get the software i will need a Cisco account.

Great ( NOT ) … In order to download from Cisco you will need: “Have a valid Technical Support Services Agreement”

Now i have to wait a bit until my friend who has the account will download it for me. Time to get something to eat. This is going to be a loooooooong night.

Got the file. One big zip unpacked in tftp directory. Created a file named: XMLDefault.cnf.xml

4) got the files. DHCP server updated …

class "cisco7945"
{
match if substring (option vendor-class-identifier,0,32) = "Cisco Systems, Inc. IP Phone CP-";    #<----Matches first 32 characters
option tftp-server-name "172.17.0.1";
}

5) Press # while plugin the power and then “123456789*0#” to enter the upgrade sequence.

6) At this point the phone will request from tftp a file named : term45.default.loads

7) The phone is quite bricked. Requesting something via UPNP and there you go … another brick in the wall.

8) After 1 day of intense internet  searching  i found out that SIP45.8-5-2S was the the one firmware to go with. Worked like a charm.The firmware loaded as expected so the phone is now SIP.

9) Time to make it talk to yate. This is much more difficult than i expected. I have a small yate instalation here and usually i’m connecting to it with Xten clients .I added a number and a password for cisco phone ( from freesentral ) but at this point i’m stuck at registering. It doesn’t wat to register to yate.

I guess it will be at least another day of searching.

Performance monitoring best practices

When you design a servers performance monitoring system there are several things that you will have to consider. Best practices when implementing such systems are:

  • Set up a monitoring configuration
  • Keep monitoring overhead low
  • Centralized place for monitoring
  • Analyze performance results and establish a performance baseline
  • Set alerts
  • Tune performance
  • Plan ahead

When setting up a monitoring system you have to consider what kind of system is “good enough” for you. You will have to decide if you go with an opensource monitoring system or if you go with a commercial system. Since i’m not a fan of commercial closed source system i will focus on opensource solutions:

  1. Nagios – Nagios is a powerful monitoring system that enables organizations to identify and resolve IT infrastructure problems before they affect critical business processes
  2. Cacti – Cacti is a complete network graphing solution designed to harness the power of RRDTool‘s data storage and graphing functionality. Cacti provides a fast poller, advanced graph templating, multiple data acquisition methods, and user management features out of the box.
  3. Munin – Munin the monitoring tool surveys all your computers and remembers what it saw. It presents all the information in graphs through a web interface. Its emphasis is on plug and play capabilities.
  4. You may also want to take a look at http://compari.tech/bandwidthmonitoring for some other useful bandwidth monitoring tools

Nagios has the advantage that it can be set up to send SMS alerts to predefined groups of users in case of alerts. Cacti has the advantage that you can evaluate in time how your systems performs and you can have a good idea of the trends. Munin can monitor certain aspects better than Cacti but is more invasive on the systems you install it on.

Next thing will be to keep the monitoring overhead low. This can be done by :

  1. Don’t query the servers too often.
  2. Monitoring system should be tun on a standalone server that does monitoring and nothing else.
  3. Archive unneeded data.
  4. Use asynchronous requests when possible

On previous point i said that monitoring system should run on a standalone server . This means exactly Centralized place for monitoring .

Ideally, all logs from different areas of monitoring should be stored in a centralized place where one UI can be used to analyze the data. Based on your user scenarios, consider identifying which teams to partner with, so log data can be viewed as a coherent whole. The reasons behind centralization are:

  1. You can easy implement a strict user control / user policy / procedures ( You will need it if you need  Sarbanes-Oxley compliant )
  2. Minimize the admin time. Imagine that you have 20 servers and each one with it’s own monitoring system.
  3. Giving access to some users on relevant graphs / logs is easy
  4. You can get an overview on the whole system

After you implemented the system and data starts to pile up you can do an analysis of performance results . This should be done as often as possible in order to identify trends and also to catch “exceptions”. For example at the end of each month servers that runs accounting will have increased load than on a normal day. If you do not pay attention you might find yourself in pretty delicate position when users requests more capacity or more processing power and according to trend it wasn’t necessary.

After getting a base line for the performance you can Set alerts for moments that systems behave out of the ordinary or for problems with the system. For example if a server uses 15G RAM out of 16G RAM you might want to be notified about that to schedule a downtime to add more RAM or to see what is going on with the applications running on that server.

Performance tunning is a delicate job and take an awful lot of time. Because a system can be optimized according to a scenario. If the data doesn’t fit in that scenario you might need to adjust servers parameters in order to adapt to the scenario. Databases, apache servers, kernel parameters can be tuned to suit your needs.

Also the baseline and graphs of the performance allows you to Plan ahead the evolution of your systems. For example you can predict with good accuracy when or if your will need to purchase new hardware or when you will need to upgrade your existing systems.